| “This site contains affiliate links for which OEMDTC may be compensated” |
L-SB-0120-08
September 24, 2008
Fuel Door Loose or Difficult to Close
Service Category
Vehicle Exterior
Section
Door/Hatch
Market
USA
Applicability
| YEAR(S) | MODEL(S) | ADDITIONAL INFORMATION |
|---|---|---|
| 2006 | GS300 | |
| 2007 – 2008 | GS350 | |
| 2006 – 2007 | GS430 | |
| 2007 – 2008 | GS450H | |
| 2008 | GS460 |
Introduction
Some Lexus GS customers may complain that the fuel door is difficult to close or feels loose when closed. An improved fuel filler pipe shield has been developed to correct this condition. Refer to the repair procedure below to replace the fuel filler pipe shield.
Production Change Information
| MODEL | DRIVETRAIN | PRODUCTION CHANGE EFFECTIVE VIN |
|---|---|---|
| GS350 | 3.5L V6 4WD | JTHCE96S680013826 |
| GS350 | 3.5L V6 | JTHBE96S780029822 |
| GS460 | 4.6L V8 | JTHBL96S385000648 |
| GS450H | 3.5L Hybrid | JTHBC96S185012863 |
Parts Information
| PREVIOUS PART NUMBER | CURRENT PART NUMBER | PART NAME | QTY |
|---|---|---|---|
| 77290-30110 | Same | Fuel Tank Filler Pipe Shield Assembly 1 | 1 |
| 77290-30120 | |||
| (GS450h) |
Warranty Information
| OP CODE | DESCRIPTION | TIME | OFP | T1 | T2 |
|---|---|---|---|---|---|
| EG8036 | R & R Fuel Tank Filler Pipe Shield & adjust mount | 0.8 | 77290-30110 | 9A | 40 |
APPLICABLE WARRANTY
- This repair is covered under the Lexus Comprehensive Warranty. This warranty is in effect for 48 months or 50,000 miles, whichever occurs first, from the vehicle’s in-service date.
- Warranty application is limited to correction of a problem based upon a customer’s specific complaint.
Required Tools & Equipment
| SPECIAL SERVICE TOOLS (SST’S) | PART NUMBER | QTY |
|---|---|---|
| Plastic Pry Tool Set* | 00002-06000-01 | 1 |
* Essential SST.
NOTE
Additional SSTs may be ordered by calling SPX/OTC at 1-800-933-8335.
Repair Procedure
- Open the fuel door.
- Remove the luggage compartment floor mat.
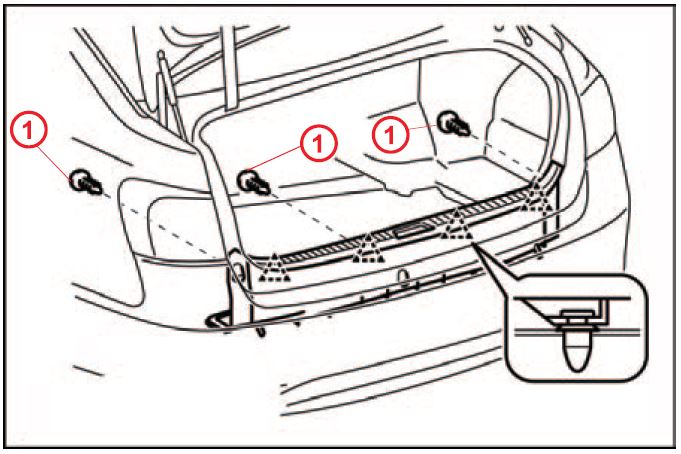
- Remove the trunk opening finish trim.
A. Remove the 3 clips labeled A.
B. Detach the 4 clips to remove the finish plate.
Figure 1.
| 1 | Clip A |
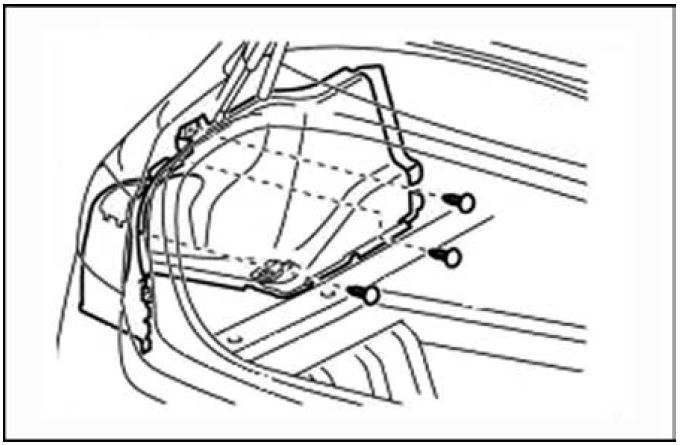
- Remove the LH luggage compartment trim cover.
Using a plastic pry tool, remove the 3 clips and trim cover.
Figure 2.
| NOTE
Luggage compartment trim panel disassembly varies among GS models. Some removal of other panels may be necessary to remove the LH trim cover. Refer to the Technical Information System (TIS) Repair manual, • 2006 model year GS 300/GS 430, Vehicle Exterior – Door/Hatch – Fuel Lid Opener Motor Assembly: Removal” (Removal of the motor assembly is NOT required) • 2007 model year GS 350/GS 430, Vehicle Exterior – Door/Hatch – Fuel Lid Opener Motor Assembly: Removal” (Removal of the motor assembly is NOT required) • 2007 model year GS 450h Vehicle Exterior – Door/Hatch – Fuel Lid Opener Motor Assembly: Removal” (Removal of the motor assembly is NOT required) • 2008 model year GS 350/GS 460, Vehicle Exterior – Door/Hatch – Fuel Lid Opener Motor Assembly: Removal” (Removal of the motor assembly is NOT required) • 2008 model year GS 450h Vehicle Exterior – Door/Hatch – Fuel Lid Opener Motor Assembly: Removal” (Removal of the motor assembly is NOT required) |
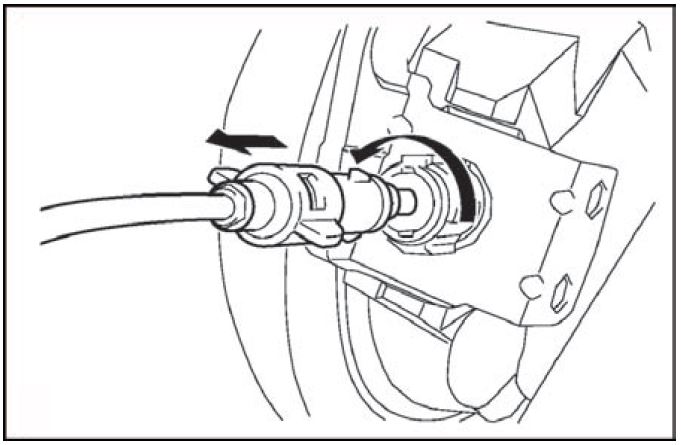
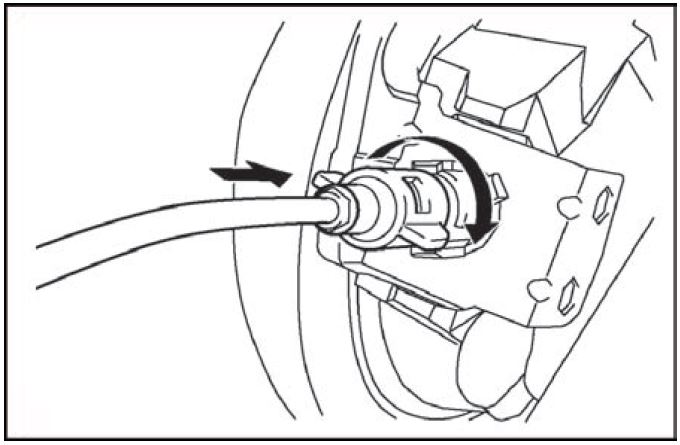
- Remove the fuel door opener motor cable from the retainer.
A. From inside the luggage compartment, locate the fuel door opener motor cable.
B. Turn the cable counterclockwise to remove.
Figure 3.
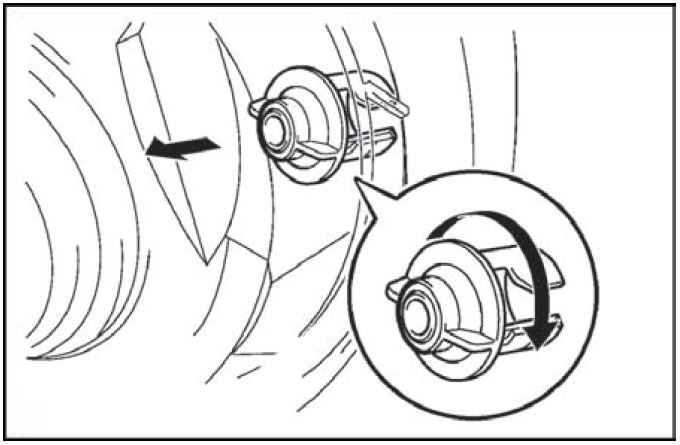
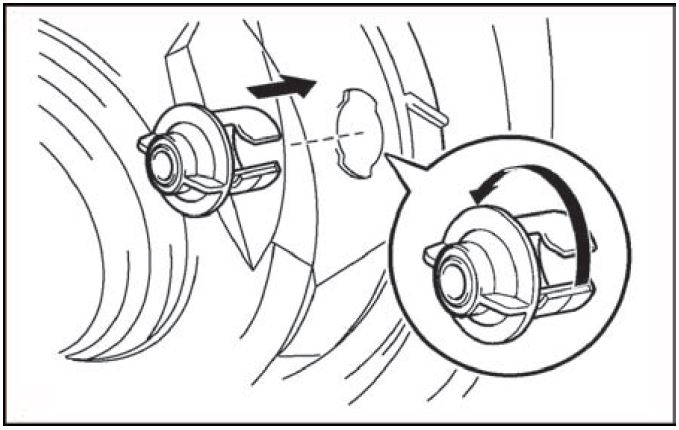
- Turn the cable lock retainer clockwise and remove from the fuel filler pipe shield.
Figure 4.
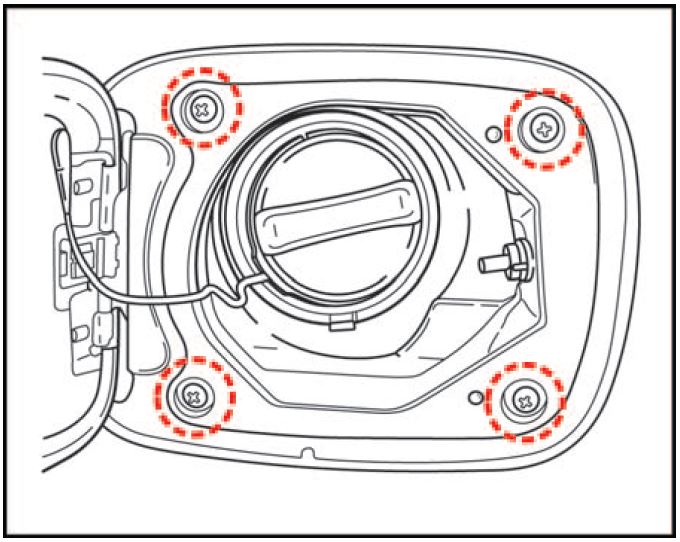
- Remove the 4 screws securing the fuel tank filler pipe shield.
Figure 5.
- Remove the fuel tank filler pipe shield and replace with the updated part.
- Reinstall the 4 screws.
- Reinstall the cable lock retainer and turn it counterclockwise to lock.
Figure 6.
- Reinstall the fuel door opener motor cable and turn the cable clockwise to lock.
Figure 7.
- Test the operation of the fuel door.
- If the operation of the fuel door is normal, install the interior luggage compartment trim and mat. If the fuel door does not operate correctly continue to the next step.
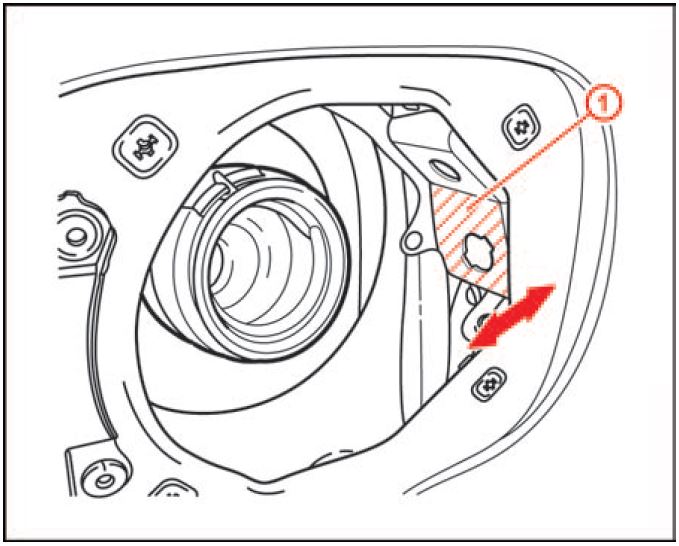
- Remove opener cable, lock retainer, and filler pipe shield again.
Figure 8.
| 1 | Adjust to proper position |
- Adjust the sheet metal of the fuel door cable mount towards the front or rear of the vehicle to achieve correct operation (See Figure 8).
NOTE
Do NOT damage the protective coating of the sheet metal.
- Reinstall filler pipe shield, lock retainer and cable and retest. If operation is normal reinstall the interior luggage compartment trim and mat. If the fuel door does NOT operate correctly repeat the adjustment step.
 Loading...
