| “This site contains affiliate links for which OEMDTC may be compensated” |
NV001-02
August 6, 2002
Title:
HEAT SHIELD RATTLE
Models:
’02 ES300
Introduction
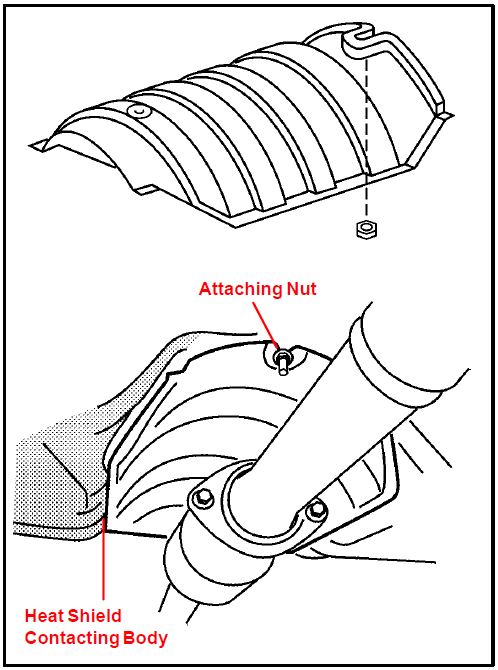
Under certain conditions, the heat shield for the catalytic converter on some 2002 model year ES300 vehicles may be the source of a rattling sound. This rattle noise is most noticeable when driving at vehicle speeds above 50 mph, at which time, the air passing under the vehicle may cause the heat shield to vibrate and contact the body. As a result of this, the heat shield may generate a metallic rattle that sounds like it emanates from the dash or center console area.
Applicable Vehicles
2002 model year ES300 vehicles BEFORE the Production Change Effective VINs listed below.
Production Change Information
| PLANT | PRODUCTION CHANGE EFFECTIVE VIN |
|---|---|
| Tsutsumi | JTHBF3#G#20027634 |
| TMK | JTHBF3#G#25019970 |
Parts Information
| PREVIOUS PART NUMBER | CURRENT PART NUMBER | PART NAME | ||||||
|---|---|---|---|---|---|---|---|---|
| 58152-06030 | Same | Insulator, FR Floor Heat, No. 1 LWR | ||||||
Tools & Material Required
| TOOLS & MATERIALS | QUANTITY | ||
|---|---|---|---|
| Thick Work Gloves | 1 |
Warranty Information
| OP CODE | DESCRIPTION | TIME | OPN | T1 | T2 | ||
|---|---|---|---|---|---|---|---|
| EG1004 | Reposition Heat Shield | 0.6 | 58152–33040 | 91 | 81 | ||
| Applicable Warranty*:
This repair is covered under the Lexus Comprehensive Warranty. This warranty is in effect for 48 months or 50,000 miles, whichever occurs first, from the vehicle’s in-service date. |
* Warranty application is limited to correction of a problem based upon a customer’s specific complaint.
Repair Procedure
- While wearing work gloves, loosen the two nuts that attach the heat shield to the vehicle body.
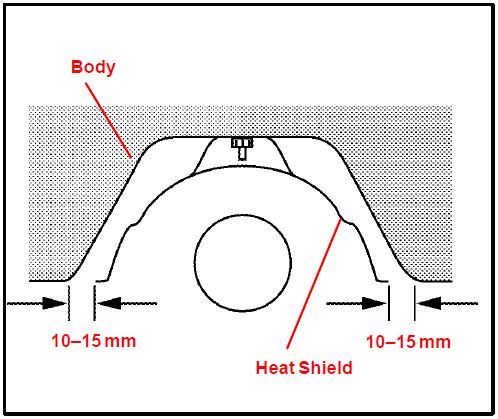
- Reposition the heat shield to center it, ensuring a minimum of 10 to 15 mm of clearance between both sides of the heat shield and the vehicle body.
- If the heat shield is too wide to obtain the necessary clearances using the procedure in step 2, reposition both the left and right outer edges of the heat shield inward until the minimum clearance has been established.
- Re–tighten the nuts securing the heat shield to the vehicle body.
- Test drive the vehicle at speeds above 50 mph to verify the effectiveness of the repair.
 Loading...


