| “This site contains affiliate links for which OEMDTC may be compensated” |
T-SB-0229-09
July 27, 2009
Brake Booster Rattle/Buzz Noise
Applicability
| YEAR(S) | MODEL(S) | ADDITIONAL INFORMATION |
|---|---|---|
| 2005 – 2010 | Avalon | |
| 2007 – 2010 | Camry | |
| 2008 – 2009 | Highlander | |
| 2006 – 2009 | RAV4 | |
| 2004 – 2010 | Sienna |
Introduction
Some Toyota vehicles may exhibit a rattle or buzz type noise coming from the driver’s instrument panel area. The noise can be duplicated when lightly accelerating and then decelerating, or when depressing the brake pedal with the shift lever in Park and then releasing brake pedal. An updated vacuum check valve is now available to reduce this noise.
Parts Information
| MODEL | MODEL YEAR | VALVE SHAPE | PREVIOUS PART NUMBER | CURRENT PART NUMBER | PART NAME | QTY |
|---|---|---|---|---|---|---|
| Camry (TMMK, SIA) | 2007-2010 | Straight Valve | 44730-22150 | 44730-20080 | Vacuum Valve Assembly | 1 |
| Highlander | 2008-2009 | |||||
| Avalon | 2005-2010 | |||||
| RAV4 | 2006-2009 | 90 Degree | 44730-12070 | 44730-14050 | Vacuum Valve Assembly | 1 |
| Sienna | 2004-2010 |
Warranty Information
| MODEL | MODEL YEAR | OP CODE | DESCRIPTION | TIME | OFP | T1 | T2 |
|---|---|---|---|---|---|---|---|
| Camry (TMMK, SIA) | 2007- 2010 | BR9004 | BR9004 R & R Brake Booster Vacuum Check Valve | 0.8 | 44730- #2##0 | 91 | 99 |
| Highlander | 2008- 2009 | 0.4 | |||||
| Avalon | 2005- 2010 | 0.4 | |||||
| RAV4 | 2006- 2009 | 0.4 | |||||
| Sienna | 2004- 2010 | 0.8 |
APPLICABLE WARRANTY
|
Repair Procedure
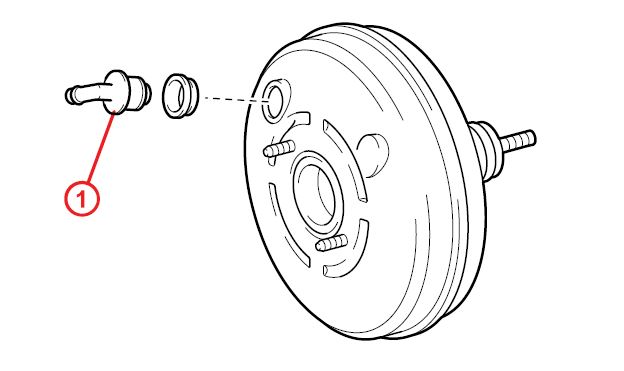
- Confirm the noise is coming from the brake booster vacuum check valve.
Figure 1.
| 1 | Vacuum Check Valve |
- Remove the vacuum tube clip from the brake booster check valve and disconnect tube.
- Remove and replace the brake booster vacuum check valve.
| NOTE
Make sure NEW valve is fully seated into brake booster grommet and returned to original condition. |
- Reconnect vacuum tube to the brake booster check valve and secure with clip.
- Confirm no vacuum leaks.
- Confirm the noise has been eliminated.
 Loading...
Price Disclaimer


