| “This site contains affiliate links for which OEMDTC may be compensated” |
NHTSA Campaign Number: 17V462
Manufacturer Toyota Motor Engineering & Manufacturing
Components POWER TRAIN
Potential Number of Units Affected 671
Front Drive Shaft may Separate
A front driveshaft separation would result in a loss of propulsion while driving, and if the driver exits the vehicle without applying the parking brake, the vehicle may roll. Both scenarios can increase the risk of a crash.
Summary
Toyota Motor Engineering & Manufacturing (Toyota) is recalling certain 2016 Camry Hybrid and Avalon Hybrid vehicles.
The front drive shaft may separate.
Remedy
Toyota will notify owners, and dealers will check the serial number of the vehicle’s drive shaft, replacing any that are affected, free of charge.
The recall is expected to begin August 11, 2017.
Owners may contact Toyota customer service at 1-800-331-4331.
Toyota’s number for this recall is H0M.
Notes
Owners may also contact the National Highway Traffic Safety Administration Vehicle Safety Hotline at 1-888-327-4236 (TTY 1-800-424-9153), or go to www.safercar.gov.
Check if your Vehicle has a Recall
◄ IMPORTANT UPDATE ►
The attached Dealer Letter has been updated. Refer to the details below.
| DATE | TOPIC |
|---|---|
| July 26, 2017 | The warranty reimbursement procedure section has been updated with the remedy op codes. |
The most recent update in the attached Dealer Letter will be highlighted with a red box.
Please review this notification with your staff to assure that all relevant personnel have been briefed regarding this subject.
Thank you for your cooperation.
Original Publication Date: July 20, 2017
| To: | All Toyota Dealer Principals, General Managers, Service Managers, and Parts Managers |
| Subject: | Safety Recall H0M – Remedy Notice Certain 2016 Avalon HV Certain 2016 Camry HV Front Drive Shaft Replacement |
On July 20, 2017, Toyota filed a Defect Information Report (DIR) with the National Highway Traffic Safety Administration (NHTSA) informing the agency of our intent to conduct a voluntary Safety Recall on certain 2016 model year Avalon HV vehicles and certain 2016 model year Camry HV vehicles.
Condition
The front drive shaft assembly in the involved vehicles may have been misassembled. This could cause vehicle vibration and certain components in the drive shaft assembly to separate, resulting in a loss of propulsion while driving, and the transmission not holding the vehicle when shifted into the “Park” position. A loss of propulsion while driving at higher speeds could increase the risk of a crash. Additionally, if the driver exits the vehicle without applying the parking brake, the vehicle could roll away with the transmission in “Park”, increasing the risk of a crash.
Remedy
Any Toyota dealer will inspect the front drive shafts to determine if the vehicle is equipped with an affected part. If so, the affected drive shafts will be replaced at NO CHARGE to customers. For additional information on inspection and remedy procedures, refer to the technical instructions on TIS.
Covered Vehicles
There are approximately 700 vehicles covered by this Safety Recall. There are no vehicles which were distributed to Puerto Rico.
| Model Name | Model Year | Approximate UIO | Production Period |
|---|---|---|---|
| Avalon HV | 2016 | 300 | Mid-January, 2016 – Early February, 2016 |
| Camry HV | 2016 | 400 | Mid-January, 2016 – Late January, 2016 |
Owner Letter Mailing Date
Toyota will begin to notify owners in early August 2017.
Toyota makes significant effort to obtain current customer name and address information from each state through industry resources when mailing owner letters. In the event your dealership receives a notice for a vehicle that was sold prior to the Safety Recall announcement, it is the dealership’s responsibility to forward the owner letter to the customer who purchased the vehicle.
Please note that only owners of the covered vehicles will be notified. If you are contacted by an owner who has not yet received a notification, please verify eligibility by confirming through TIS prior to performing repairs. Dealers should perform the repair as outlined in the Technical Instructions found on TIS.
New Vehicles in Dealership Inventory
There are approximately 4 vehicles in new dealer inventory as of July 20, 2017.
| Under Title 49, Section 30112 of the United States Code, a dealer cannot sell, offer for sale, or introduce or deliver for introduction in interstate commerce a new motor vehicle when it is aware that the vehicle does not comply with an applicable Federal Motor Vehicle Safety Standard or contains a defect related to motor vehicle safety. In addition, 49 Code of Federal Regulations §577.13 requires us to provide the following advisory: It is a violation of Federal law for a dealer to deliver a new motor vehicle or any new or used item of motor vehicle equipment (including a tire) covered by this notification under a sale or lease until the defect or noncompliance is remedied.
Vehicle Safety Recall completion should always be verified through TIS. We request your assistance to ensure involved vehicles are identified and not delivered prior to performing the remedy. |
Pre-Owned Vehicles in Dealer Inventory
Toyota requests that dealers do not deliver any pre-owned vehicles in dealer inventory that are covered by a Safety Recall unless the defect has been remedied.
Toyota Certified Used Vehicle (TCUV)
The TCUV policy prohibits the certification of any vehicle with an outstanding Safety Recall, Special Service
Campaign, or Limited Service Campaign. Thus, no affected units are to be designated, sold, or delivered as a TCUV until all applicable Safety Recalls, Special Service Campaigns, and Limited Service Campaigns have been completed on that vehicle.
Toyota Rent-A-Car (TRAC) & Service Loaners
Toyota requests that dealers remove all TRAC and Service Loaner vehicles from service that are covered by a Safety Recall unless the defect has been remedied.
Technician Training Requirements
The repair quality of covered vehicles is extremely important to Toyota. All dealership technicians performing this repair are required to successfully complete the most current version of the E-Learning course “Safety Recall and Service Campaign Essentials”. To ensure that all vehicles have the repair performed correctly; technicians performing this repair are required to currently hold at least one of the following certification levels:
- Certified Technician (Drivetrain)
- Expert Technician (Drivetrain)
- Master Technician
- Master Diagnostic Technician
Always check which technicians can perform the recall remedy by logging on to https://www.uotdealerreports.com. It is the dealership’s responsibility to select technicians with the above certification level or greater to perform this repair. Carefully review your resources, the technician skill level, and ability before assigning technicians to this repair. It is important to consider technician days off and vacation schedules to ensure there are properly trained technicians available to perform this repair at all times.
Remedy Procedures
Refer to TIS for Technical Instructions on repair. Conduct all non-completed Safety Recalls and Service Campaigns on the vehicle during the time of appointment.
Repair Quality Confirmation
The repair quality of covered vehicles is extremely important to Toyota. To help ensure that all vehicles have the repair performed correctly, please designate at least one associate (someone other than the individual who performed the repair) to verify the repair quality of every vehicle prior to customer delivery.
Parts Ordering Process – Non SET and GST Parts Ordering Process
Due to potentially limited availability, the parts may have been placed on either Manual Allocation Control (MAC) or Dealer Ordering Solutions (DOS). As the parts inventory changes, the ordering process may change. Please check the Toyota Special Activities MAC/DOS report on Dealer Daily for the most up-to-date parts ordering information.
All Safety Recall, Service Campaign (SSC/LSC) parts are eligible for the Monthly Parts Return Program. Please refer to PANT Bulletin 2011-087 for campaign parts that are currently returnable under the Monthly Parts Return Program and for additional details.
NOTE: Remedy inspection website will provide further parts ordering information, if it is determined part replacement is required.
Campaign Special Service Tools
A 2D Barcode Scanner is required to complete the remedy inspection process. These scanners have been provided to dealers as part of previous recalls. These scanners ARE NOT available through normal Toyota parts or tool channels.
| Name | Sample Image |
|---|---|
| 2D Barcode Scanner |  |
Remedy Procedure
Please refer to TIS for Technical Instructions on the inspection and repair process.
|
Remedy Inspection Website The Technical Instructions will direct you to a website as part of the inspection procedure. The Remedy Inspection website will be available starting July 20, 2017 at 12PM PST. For your reference, the website and default password is listed below: https://toyota-h0m-avalon-camry.imagespm.info Username: Dealer Code Default Password: xxxxx Each dealer only has a single account; please ensure that the reset password is communicated to all technicians and dealer associates that will be utilizing this website. |
Warranty Reimbursement Procedure

| Opcode | Description | Flat Rate Hours |
|---|---|---|
| GGG71A | Inspect BOTH front drive shafts – NO REPLACEMENT NEEDED | 0.3 |
| GGG71B | Inspect BOTH front drive shafts – Replace LH OR RH front driveshaft | 2.1 |
| GGG71C | Inspect BOTH front drive shafts – Replace LH AND RH front driveshafts | 2.7 |
- The flat rate times include 0.1 hours for administrative cost per unit for the dealership.
Claim Filing Accuracy and Correction Requests
It is the dealer’s responsibility to file claims correctly for this Safety Recall. This claim filing information is used by Toyota for various government reporting activities; therefore, claim filing accuracy is crucial. If it has been identified that a claim has been filed using an incorrect opcode or a claim has been filed for an incorrect VIN, refer to Warranty Procedure Bulletin PRO17-03 to correct the claim.
Media Contacts
It is imperative that all media contacts (local and national) receive a consistent message. In this regard, all media contacts must be directed to Victor Vanov (469) 292-1318 in Toyota Corporate Communications. Please do not provide this number to customers. Please provide this contact only to media.
Customer Contacts
Customers who receive the owner letter may contact your dealership with questions regarding the letter and/or the Special Service Campaign. Please welcome them to your dealership and answer any questions that they may have. A Q&A is provided to assure a consistent message is communicated.
Customers with additional questions or concerns are asked to please contact the Toyota Customer Experience Center (1-888-270-9371) – Monday through Friday, 7:00 am to 7:00 pm, Saturday 7:00 am to 4:30 pm Central Time.
Campaign Designation Decoder
 |
| Examples:
C1B = Launched in 2012, Interim Phase, 2nd Campaign Launched in 2012 |
Please review this entire package with your Service and Parts staff to familiarize them with the proper stepby-step procedures required to implement this Safety Recall.
Thank you for your cooperation.
TOYOTA MOTOR SALES, U.S.A., INC.
Safety Recall H0M – Remedy Notice
Certain 2016 Avalon HV
Certain 2016 Camry HV
Front Drive Shaft Replacement
Q1: What is the condition?
A1: The front drive shaft assembly in the involved vehicles may have been misassembled. This could cause vehicle vibration and certain components in the drive shaft assembly to separate, resulting in a loss of propulsion while driving, and the transmission not holding the vehicle when shifted into the “Park” position. A loss of propulsion while driving at higher speeds could increase the risk of a crash. Additionally, if the driver exits the vehicle without applying the parking brake, the vehicle could roll away with the transmission in “Park”, increasing the risk of a crash.
Q1a: Are there any warning signs that this condition occurs?
A1a: In some instances, the driver may experience noise and/or vibration while driving.
Q2: What is Toyota going to do?
A2: Toyota will send an owner notification by first class mail starting in early August, 2017, advising owners to make an appointment with their authorized Toyota dealer. The dealer will inspect and, if necessary replace the front drive shaft(s) at NO CHARGE.
Q3: Which and how many vehicles are covered by this Safety Recall?
A3: There are approximately 700 vehicles covered by this Safety Recall.
| Model Name | Model Year | Approximate UIO | Production Period |
| Avalon HV | 2016 | 300 | Mid-January, 2016 – Early February, 2016 |
| Camry HV | 2016 | 400 | Mid-January, 2016 – Late January, 2016 |
Q3a: Are there any other Lexus/Toyota/Scion vehicles covered by this Safety Recall in the U.S.?
A3a: No, there are no other Lexus/Toyota/Scion vehicles covered by this Safety Recall.
Q4: How long will the repair take?
A4: If the vehicle does not require driveshaft replacement, the repair will take approximately 45 minutes. If the vehicle requires driveshaft replacement, the repair will take approximately 3 hours. However, depending on the dealer’s work schedule, it may be necessary to make your vehicle available for a longer period of time.
Q5: How does Toyota obtain my mailing information?
A5: Toyota uses an industry provider who works with each state’s Department of Motor Vehicles (DMV) to receive registration or title information, based upon the DMV records. Please make sure your registration or title information is correct.
Q6: What if I have additional questions or concerns?
A6: If you have additional questions or concerns, please contact the Toyota Customer Experience Center at 1-888-270-9371 Monday through Friday, 7:00 am to 7:00 pm, Saturday 7:00 am to 4:30 pm Central Time.
TECHNICAL INSTRUCTIONS
FOR
SAFETY RECALL H0M
FRONT DRIVE SHAFT REPLACEMENT
CERTAIN 2016 CAMRY HV & 2016 AVALON HV
The repair quality of covered vehicles is extremely important to Toyota. All dealership technicians performing this recall are required to successfully complete the most current version of the E-Learning course “Safety Recall and Service Campaign Essentials”. To ensure that all vehicles have the repair performed correctly; technicians performing this recall repair are required to currently hold at least one of the following certification levels:
- Certified Technician (Drivetrain)
- Expert Technician (Drivetrain)
- Master Technician
- Master Diagnostic Technician
It is the dealership’s responsibility to select technicians with the above certification level or greater to perform this recall repair. Carefully review your resources, the technician skill level, and ability before assigning technicians to this repair. It is important to consider technician days off and vacation schedules to ensure there are properly trained technicians available to perform this repair at all times.
I. OPERATION FLOW CHART
II. IDENTIFICATION OF AFFECTED VEHICLES
- Check the TIS Vehicle Inquiry System to confirm the VIN is involved in this Safety Recall, and that the Campaign has not already been competed prior to dealer shipment or by another dealer.
- TMS warranty will not reimburse dealers for repairs completed on vehicles that are not affected or were completed by another dealer.
III. PREPARATION
A. PARTS
- If replacement parts are required, the part numbers will be detailed on the Drive Shaft Barcode Scanning website.
- Due to a limited supply of parts, please order parts on an as-needed basis.
B. TOOLS & EQUIPTMENT
- Techstream
- Standard Hand Tools
- 30mm 12pt. deepwell socket
- Torque Wrench
C. SST – Special Service Tools required for this repair:
| Part Number | Tool Name | Quantity |
|---|---|---|
| 09960-20010 | Ball Joint Puller | 1 |
| 09930-00010 | Drive Shaft Nut Chisel | 1 |
| 09520-01010 | Drive Shaft Remover Attachment | 1 |
| 09520-32040 | Slide Hammer | 1 |
D. MATERIALS
- Toyota Genuine WS ATF (00289-ATFWS)
- Toyota Body Grease W (08887-02007)
- Universal Multi-Purpose Grease
IV. BACKGROUND
| The front drive shaft assembly in the involved vehicles may have been misassembled. This could cause vehicle vibration and certain components in the drive shaft assembly to separate, resulting in a loss of propulsion while driving, and the transmission not holding the vehicle when shifted into the “Park” position. A loss of propulsion while driving at higher speeds could increase the risk of a crash. Additionally, if the driver exits the vehicle without applying the parking brake, the vehicle could roll away with the transmission in “Park”, increasing the risk of a crash. |
 |


V. SCAN DRIVE SHAFT LH & RH
1. ACCESS WEBSITE
2. INPUT DEALER CODE & PASSWORD
a. Input your dealer code and password
Note: The first time a dealership logs on to this website, the default password is xxxxx (5 lowercase x’s). If you change the password, be sure to notify the other dealership associates that will using this website.

3. INPUT VIN
a. Using either a scanner or the keyboard, enter the vehicles VIN number.
Note: If the VIN of this vehicle does not apply to this Recall no further action is required and the campaign is complete

4. SCANDRIVE SHAFT LH
a. Using either a scanner or the keyboard, enter the barcode from the Drive Shaft LH.
Note: If label cannot be scanned or is missing, select the “check if no barcode to scan” box.

5. SCANDRIVE SHAFT RH
a. Using either a scanner or the keyboard, enter the barcode from the Drive Shaft RH.
Note: If label cannot be scanned or is missing, select the “check if no barcode to scan” box.

6. DETERMINE RESULTS
a. Scannable Barcodes: On the “Scan Results for VIN” screen for this vehicle, note the status of the “Results:” indicator for both LH & RH. These lines will indicate if the drive shafts for either side, or possibly both sides, will need to be replaced.
b. Non-Scannable Barcodes: On the Serial Barcode Scan Results screen for this vehicle, note the status of the “Results:” indicator for both LH & RH.


- If results for BOTH LH and RH is “Part is OK do not replace”, this Safety Recall is complete. Return the vehicle to the customer.
- If Results for LH or RH is “Replace per Technical Instructions”, proceed to Step # VI. DISASSEMBLE SUSPENIONS LH OR RH on page #7.
VI. DISASSEMBLE SUSPENSION LH or RH
6. DRAIN HYBRID TRANSAXLE FLUID
- Using a 10mm hexagon wrench, remove the filler plug and gasket.
- Using a 10mm hexagon wrench, remove the drain plug and gasket to drain the hybrid transaxle fluid.
- Using a 10mm hexagon wrench, install the drain plug with a NEW gasket.
Torque: 29 ft.lbs {39 N∙m, 400 kgf∙cm}

| *1 | Filler Plug |
| *2 | Drain Plug |
7. REMOVE FRONT WHEEL
8. REMOVE FRONT AXLE NUT
a. Using a hammer and the SST, release the staked section of the front axle shaft nut: SST: 09930-00010
b. Using a 30mm 12point deep well socket, remove the axle nut:

9. REMOVE STABILIZER BAR LINK LOWER
a. Remove the nut from the lower end of the end link and separate the it from the stabilizer bar.
b. Swing the end link upward, making enough room to remove the drive shaft.

10. SEPARATE TIE ROD
a. Remove cotter pin and nut
b. Reinstall the nut upside down until it is flush with the end of the ball joint stud to protect the threads during removal.
c. Using SST, separate the tie rod from the steering knuckle.
SST: 09960-20010

| *1 | Center Nut | – | – |
| *a | String | *b | Grease Application Area |
| ⇒ | Place the wrench here. | – | – |
CAUTION:
Apply grease to the bolt threads and the tip off SST.
NOTICE:
- Install SST with the center nut so that A and B shown in the illustration are parallel. Otherwise, the dust cover may be damaged.
- Be sure to place the wrench on the part indicated in the illustration.
- Do not damage the front disc brake dust cover.
- Do not damage the ball joint dust cover.
- Do not damage the steering knuckle.
11. SEPARATE LOWER SUSPENSION ARM
a. Remove the bolt and 2 nuts.
b. Separate the lower control arm from the ball joint.

- If replacing the LH side, or both sides, Skip to Section VII. REPLACE DRIVE SHAFT LH on page #9
- If replacing the RH side, skip to Section VIII. REPLACE DRIVE SHAFT RH on page #9
VII. REPLACE DRIVE SHAFT LH
1. REMOVE DRIVE SHAFT LH
a. Pull outward on the steering hub and slide the outboard drive shaft out of the wheel bearing.
b. Using SST, remove the inboard drive shaft from the transmission.
SST: 09520-00031
SST: 09520-01010

| Hold the inboard drive shaft while removing it from the transmission to prevent any damage to the transmission oil seal. |
2. INSTALL NEW DRIVE SHAFT LH
a. Coat the splines of the inboard drive shaft with WS ATF.
b. Coat the lip of the transmission seal with MP Grease.
c. Guide the drive shaft into the transmission, being careful not to damage the axle seal.
d. Align the inboard drive shaft splines into the transmission and push it in as far as possible by hand.
e. Using a brass bar and a hammer, engage the snap ring.
f. Pull outward by hand on the inboard drive shaft flange to ensure that the snap ring is properly engaged.

g. Apply a small amount of Toyota Body Grease W to the 8 areas of the wheel bearing as shown in the illustration.
h. Pull outward on the steering hub and slide the drive shaft through the wheel bearing.
i. If replacing ONLY the LH Drive Shaft skip to Section IX. ASSEMBLE SUSPENSION LH or RH on page 10.

VIII. REPLACE DRIVE SHAFT RH
1. REMOVE DRIVE SHAFT RH
a. Remove the bolt from the RH drive shaft bearing bracket.
b. Remove the C-Clip from the RH drive shaft bearing bracket.
| Hold the inboard axle shaft while removing it from the transmission to prevent any damage to the transaxle oil seal. |
c. Remove the RH drive shaft from the transmission and bearing support bracket.

2. INSTALL NEW AXLE SHAFT OUTBOARD RH
a. Coat the inboard splines of the drive shaft with WS ATF.
b. Coat the lip of the axle seal with MP grease.
c. Install a NEW bearing bracket snap ring on to the drive shaft.
d. Install drive shaft assembly RH into the transaxle.

| Be careful to not damage the oil seal when installing the drive shaft into the transaxle. |
e. Engage the NEW bearing bracket snap ring
f. Install NEW bolt
Torque 24 ft.lbs {32 N∙m, 330 kgf∙cm}
g. Apply a small amount of Toyota Body Grease W to the 8 areas of the wheel bearing as shown in the illustration.
h. Pull outward on the steering hub and slide the drive shaft through the wheel bearing.

IX. ASSEMBLE SUSPENSION LH or RH
3. INSTALL LOWER SUSPENSION ARM
a. Install the lower suspension arm to the ball joint.
b. Measure the outside diameter of the nuts and determine the proper torque. The bolt will be torqued to the same specification as the nuts.
Torque:
Type A: 55 ft.lbs {75 N∙m, 765 kgf∙cm}
Type B: 68 ft.lbs {92 N∙m, 938 kgf∙cm}


4. INSTALL TIE ROD
a. Connect the tie rod end to the steering knuckle. Torque: 36 ft.lbs {49 N∙m, 500 kgf∙cm}
b. Install NEW cotter pin.

5. INSTALL STABILIZER BAR LINK LOWER
a. Guide the stabilizer bar link into the stabilizer bar and install the nut.
Torque: 55 ft.lbs {74 N∙m, 755 kgf∙cm}

6. INSTALL NEW AXLE NUT
a. Clean the threaded portion of the front drive shaft and install a NEW axle shaft nut.
Torque: 217 ft.lbs {294 N∙m, 2998 kgf∙cm}
b. Using a chisel and hammer, stake the front axle nut.

7. INSTALL WHEEL
Torque: 76 ft.lbs {103 N∙m, 1049 kgf∙cm}
8. ADD TRANSAXLE FLUID
a. Using a 10mm hexagon socket wrench, remove the filler plug (*1) on the RH side of transaxle.
b. Fill the transaxle with fluid until the level is within 0-5mm (0 to .197 in.) from the bottom lip of the filler plug. Fluid type: Toyota WS ATF fluid
c. Install fill plug with a NEW gasket.
Torque: 29 ft.lbs {39 N∙m, 400 kgf∙cm}

9. ADJUST FRONT WHEEL ALIGNMENT
a. Following the Repair Manual procedure, adjustment the front wheel alignment.
Camry Front Wheel Alignment RM link
Avalon Front Wheel Alignment RM link
X. INSPECTION
| ◄ VERIFY REPAIR QUALITY ► |
If you have any questions regarding this update, please contact your regional representative. |
XI. APPENDIX
A. PARTS DISPOSAL
As required by Federal Regulations, please make sure all recalled parts (original parts) removed from the vehicle are disposed of in a manner in which they will not be reused, unless requested for parts recovery return.
B. CAMPAIGN DESIGNATION DECORDER
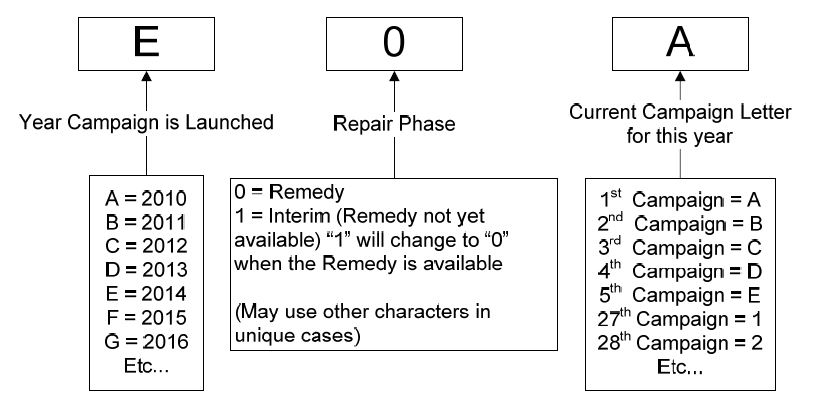 Hybrid & Avalon Hybrid 31"> Hybrid & Avalon Hybrid 31"> |
| Examples: A0D = Launched in 2010, Remedy Phase, 4th Campaign Launched in 2010 B1E = Launched in 2011, Interim Phase, 5th Campaign Launched in 2011 C1C = Launched in 2012, Interim Phase, 3rd Campaign Launched in 2012 |
 Loading...
Loading...
Loading...

