| “This site contains affiliate links for which OEMDTC may be compensated” |
EG021-07
April 17, 2007
Title:
ACCESSORY DRIVE BELT/BELT TENSIONER ASSEMBLY NOISE
Models:
’03 – ’07 Corolla & Matrix
Introduction
Some 1ZZ-FE and 2ZZ-GE engines may exhibit a squealing and/or rattling noise coming from the engine compartment during vehicle operation. The belt tensioner assembly has been improved to correct this condition.
Applicable Vehicles
- 2003 – 2007 model year Corolla and Matrix vehicles produced BEFORE the Production Change Effective VINs shown below.
Production Change Information
| MODEL | PLANT | PRODUCTION CHANGE EFFECTIVE VIN |
|---|---|---|
| Corolla | NUMMI | 1NXB*3#E*7Z841089 |
| TMMC | 2T1B*3#E*7C776998 | |
| TMC | JTDB*3#E*70116547 | |
| Matrix | TMMC | 2T1K*3#E*7C653444 |
Parts Information
| ENGINE | PREVIOUS PART NUMBER | CURRENT PART NUMBER | PART NAME | QTY |
|---|---|---|---|---|
| 1ZZ-FE | 16620-22012 | 16620-22013 | Tensioner Assembly, V-belt | 1 |
| 2ZZ-GE | 16620-22032 | 16620-22033 | 1 | |
| 1ZZ-FE | 90080-91139-83 | Same | Belt, V | 1 |
| 2ZZ-GE | 90916-A2007 | Same | 1 |
Warranty Information
| OP CODE | DESCRIPTION | TIME | OFP | T1 | T2 |
| EG7018 | R & R Accessory Drive Belt & Belt Tensioner | 0.6 | 16620-2201#
16620-2203# | 91 | 99 |
Applicable Warranty*:
This repair is covered under the Toyota Comprehensive Warranty. This warranty is in effect for 36 months or 36,000 miles, whichever occurs first, from the vehicle’s in-service date.
* Warranty application is limited to correction of a problem based upon a customer’s specific complaint.
Repair Procedure
- Verify that the noise is coming from the accessory drive belt/belt tensioner assembly.
- Inspect the accessory drive belt and belt tensioner assembly.
If there is any roughness to either of the belt tensioner assembly bearings or any sign of damage, scoring, or glazing on the accessory drive belt, replace BOTH the belt tensioner assembly and the accessory drive belt.
- Remove the drive belt.
1ZZ-FE:
A. Remove the engine under cover RH.
B. Remove the drive belt.
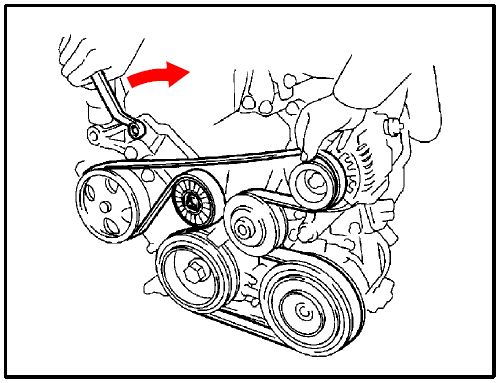
a. Turn the drive belt tensioner clockwise to relieve tension on the belt, and then remove the belt.
b. Carefully return the tensioner to the unloaded position.
NOTE:
|
2ZZ-GE:
A. Remove the engine under cover RH.
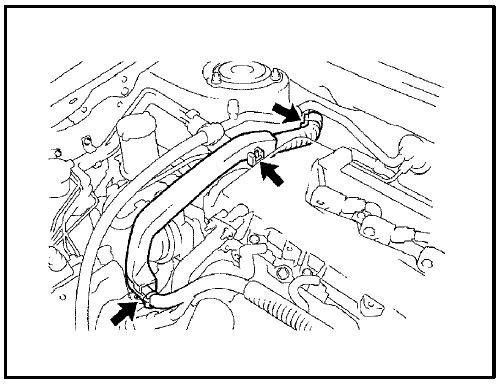
B. Remove the wire harness protector.
a. Unfasten the 3 clips,then remove the wire harness protector.
b. Disconnect the pressure sensor connector.
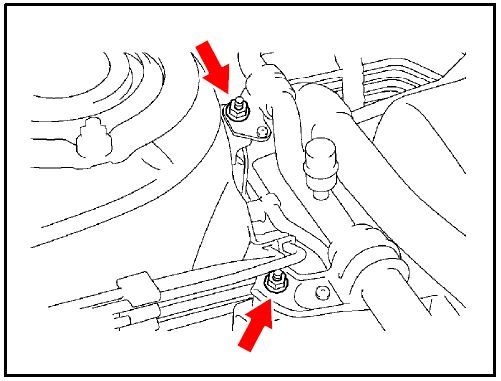
C. Disconnect the suction hose sub-assembly.
a. Remove the 2 nuts installing the suction hose sub-assembly.
b. Disconnect the suction hose sub-assembly.
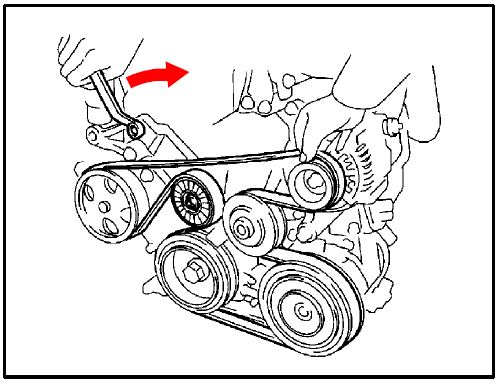
D. Remove the drive belt.
a. Turn the drive belt tensioner clockwise to relieve tension on the belt, and then remove the belt.
b. Carefully return the tensioner to the unloaded position.
NOTE:
- When retracting the tensioner, turn it clockwise SLOWLY in 3 seconds or more. Do NOT apply force rapidly.
- After the tensioner is retracted all the way, do NOT apply more force than is necessary.
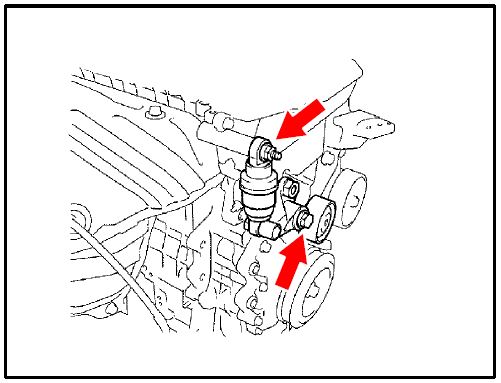
- Remove and replace the belt tensioner assembly.
1ZZ-FE:
Install a NEW drive belt tensioner assembly with the bolt and nut.
Torque:
Bolt: 69 N m (704 kgf cm, 51 ft lbf)
Nut: 29 N m (296 kgf cm, 21 ft lbf)
2ZZ-GE:
Install a NEW drive belt tensioner assembly with the bolt and nut.
Torque:
Bolt: 100 N m (1020 kgf cm, 74 ft lbf)
Nut: 29 N m (296 kgf cm, 21 ft lbf)
- Slowly move the belt tensioner at LEAST 4 times through its full stroke. (It should take at LEAST 3 seconds to work it through one full stroke.) This will release any air from the tensioner assembly and prime it for proper operation.
- Install a NEW drive belt.
- Install the engine under cover.
1ZZ-FE:
Install the engine under cover RH.
2ZZ-GE:
A. Install the suction hose sub–assembly.
Torque: 9.8 N m (100 kgf cm, 87 in. lbf)
B. Install the wire harness protector.
C. Install the engine under cover RH.
Torque: 7.0 N m (71 kgf cm, 62 in. lbf)
- Confirm the repair.
 Loading...
